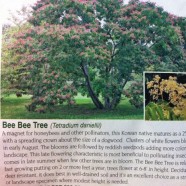
Bee Bee Tree: Adding this to planting wish list
With a name like Bee Bee Tree, you know it is going to be of interest around here! Like the Chinese Golden Raintree, the Bee Bee Tree fills a late summer niche when there are few other nectar sources for bees and pollinators. For those in the WNC mountains, this bloom chart for beekeepers is handy: http://goo.gl/aMh0a For gardeners interested in bee-friendly plants, here’s a good list : http://goo.gl/56d6s and another one with a tree list included here: http://goo.gl/VRu3f
Will be shopping for a Bee Bee Tree as soon as I have a place to plant one….maybe before if that takes a long while. May have rows of buckets of plants ready for the future homestead long before I have a homestead! Haha. What are some things on your planting wish list? (Comment link is just above the picture.)
Leigh
—A Larrapin Garden…currently in search of a new home in the Blue Ridge of North Carolina. Leigh’s posts on this blog may be boom or bust depending on the season, but if you subscribe here you’ll get one weekly email—usually on Wednesdays—to let you know what’s new. You are also invited to get garden related miscellany and recipes at the brand new Facebook page or on Twitter.
Read MoreFavorite Plants: Illinois Everbearing Mulberry
Of all the types of trees planted at Larrapin, the Illinois Everbearing Mulberry is one of the favorites. About three autumns back, I ordered two from Starkes Brothers Nursery in Missouri and planted them in the far chicken paddock. It was one of those permaculture “stacking” ideas: shade in the pasture, snacks for the chickens who *love* the wine-colored berries that fall easily when ripe, valuable food for songbirds and potential distraction from other fruit, possible future pies for the farmers, and the clean-up services of the chickens for the same berries which stain wildly if tracked in the house. The trees have accomplished all this already—except the pies—and it looks like this year could even be the pie year.
They grew quickly that first year they were planted. But when the garden had to be relocated to the middle paddock to escape the deer invasion, the two bushy trees were in a bad spot to cast too much shade. So against all tree growing wisdom, Mendy and I dug them up the following fall, cut them back drastically, and replanted in the northern chicken paddock where they would provide shade, but to the chickens, not the garden. Truth be told, I didn’t expect them to live and planned to reorder their replacements that next year. But with faithful and attentive watering to make up for their abrupt relocation, they made it.
This third spring, they are covered far and wide with green berries (above). There is just no comparison with the amount and size of the named mulberry cultivars and the wild ones, though the latter are still important to wildlife. On this tree a few berries are getting ripe already. I can’t show you those because I ate them. 🙂
Really, I take breaks from gardening, so sit on the folding chair in their shade while leisurely scanning for ripe berries and snack away. Any I drop, or accidentally knock off, are instantly devoured by the hens hanging about for just that possibility. Last summer, in the mornings I’d let out the hen girls and they would jog, chicken-run style and bloomers a-waving, to the trees to eat the berries that fell overnight. Needless to say, there aren’t any left to get tracked in the house…which normally is a major consideration when planning where to plant a mulberry tree. I can’t think of a better tree for a chicken yard.
When many berries get ripe, I hope to use the trick I learned from the blog over at Midwest Permaculture and put out a few clean sheets on the ground under the trees and shake. (Obviously, the chickens will be locked up during this event or else quite a rodeo would ensue…) Until then, the chickens lounge in the deep shade of the bushy trees—which also keep their water buckets cool…and then I dump the water buckets to give the trees some extra water (more stacking!!), snack on a few more berries and get back to gardening.
What are the favorite trees you have planted or want to plant? Please share your thoughts on the Facebook page!
—A Larrapin Garden. Please subscribe to get the posts by email most Wednesdays. You can also get bonus links, giveaways and recipes by “liking” the Facebook page or following on Twitter. And if you are in the Fayetteville, Arkansas area, you can share the herb garden’s bounty via Green Fork Farmers Market—an online & drop-by market on Wednesdays featuring all naturally-grown products.
Read MoreSeed Swaps! Info to get you started [From Feb. 2011]

Snow, Snow, More Snow at Larrapin...
[Encore post from 2/2011] It’s the time of year I start to see announcements of community seed exchanges. (See end of post for details.) There are few things more fun for a gardener to do during winter than to get to explore a new seed stash. Especially when the weather has looked like the photo above for days and days!
Seed exchanges can range from large scale community free for alls to invitation-only swaps for specialty plant geeks! But there are a few things to keep in mind during seed exchanges—or even when you are shopping seed catalogs—that will greatly increase your chances at success with the seeds you bring home.
You know you can’t save seed from grocery produce, but not everyone understands this.
At a seed exchange, it’s vital to know the person who is sharing the seeds. There are many well-intentioned folks who will save seeds from a particularly good melon or tomato from the store. “But I got it from the co-op…it was organic,” someone once told me. Most produce, even at the crunchiest co-op, are from hybrids unless they are explicitly labeled “heirloom” or similar. This includes much of the produce at farmers’ markets too. Market growers—including totally organic growers—often need the reliability, production and disease resistance that hybrids provide. Even “heirloom” produce from a store is unlikely to produce true to type (i.e. like the parent plant) because if it was grown for produce (vs. seed production) then it’s likely there were open-pollinated varieties nearby and in all likelihood they cross-pollinated! (And thus have created a hybrid, but with unknown attributes…)
Similarly, if you save seed from a great plant you bought as a seedling at most stores, it was likely a hybrid and there’s no point in saving seeds. The exception would be an heirloom (open-pollinated) seedling you bought, then followed plant isolation guidelines to keep the seed pure.
Heirloom and Open-Pollinated seeds may not produce as abundantly or reliably as hybrids.
I’ve seen folks avoid hybrids (usually labeled F1) in the seed catalogs as if they were kryptonite. Right now heirlooms (old-fashioned, open-pollinated varieties from which you can save seed to plant the next year if you follow basic seed-saving rules) are so popular that many folks forget why hybrids were developed in the first place: to accentuate certain aspects of the plant or to overcome weaknesses.
Many of us are returning to heirlooms to capture amazing flavors that, for example, are too delicate to ship. But hybrids are not some scary GMO thing. If you have say, a tomato that is wonderfully tasty but takes many months to bear, a grower might cross it with another tomato that bears early, hoping to combine the two desirable qualities. This is something you can do in your own backyard. We’re not talking crossing that tomato with a…fish, which is the level that GMO manipulation can stoop too.
Hybrids are not bad things, they just don’t produce true to type if you save the seed. So, while that does open them up to economic control such as that hybrid being “owned” by a seed producer (including the truly unsavory types, like Monsanto, who is also hard at work on particularly noxious GMOs) but hybrids are not scary. Sometimes they are very useful for specific purposes. For example, if you are growing a tomato in a northern climate, you may want the earliness some hybrids produce rather than the heirlooms, which tend to require a longer season.
Open-Pollinated Seeds may have cross pollinated and not turn out true to type if they were not isolated for seed production.
It is pretty astounding how much space is required to isolate wind or insect pollinated vegetables, like beets or squash. For beets it’s five miles and for squash it’s a half a mile! So that means, if you are growing one type of squash to save seed, and you are sure there are no other gardens within a half mile that are growing squash, then when you save the seed, they will grow true to type. The other option is an amazing dance between you and the squash that involves taping the flower shut after you’ve hand pollinated it, then monitoring to make sure bees don’t chew through the bloom to undo your work!
So before you use valuable space in your garden to grow out some free seeds you picked up at a seed exchange, find out if the seeds are going to be what you hope by talking to the gardener sharing them! Maybe the seeds were extra from a seed pack they bought. Maybe they carefully save seeds every year using isolation techniques. Maybe those seeds have been in their family for years. Or maybe not. Find out before you spend a season hoping for a cool veggies, only to be disappointed.
How on earth, you may wonder, did our grandparents manage to save seed that grew true year to year? From the older gardeners in my family, they tended to pick one type of bean, or one type of pea, and grow it year after year in the family garden…which used to be a lot farther away from neighboring gardens! But you don’t have to settle for one variety in your isolated valley or holler! Seed saving is an amazing art and skill, one well worth learning. In an upcoming post, I’ll tell you about some seed saving techniques I’ve just recently learned. In the meantime, here are some seed saving links to get you started, here, here and here. [Encore post from 2/2011]

My Seed Stash...
—A Larrapin Garden. Posts most wednesdays & weekends. Please subscribe to get the posts in one weekly email. You can also get bonus links, giveaways and recipes by “liking” our Facebook page or following on Twitter.
Dig In Food & Farming Festival
Are you in the Northwest Arkansas region? Please join us for the 2nd annual Dig In! on March 2nd & 3rd. It’s going to be great fun with films, an info-fair, free seed swap, and classes on gardening, backyard chickens and more. Please check out the website at www.diginfestival.com for more info and sign up for email updates there.
Why Start a Light Table Now? So you’ll have transplants to play with! [from 4/2011]
[From 4/2011] How I stayed sane in week of pouring rain…Playing with plants on the light table!
Getting these little guys ready to go in individual paper pots…
And visualizing the future beets and basil and more in this tray above.
Meanwhile, these guys above just need some warm weather and a garden bed that isn’t ‘too wet to plough!’ ( I love that expression even though we do essentially no-till after first breaking ground….but do use a tiller to break ground in order to avoid broken legs and knees!) Am running out of shelf space…send blue skies!
Want to make your own light table for seed starting? Here’s how: http://larrapin.us/?p=194
—A Larrapin Garden. Thanks for reading this “encore” post from April 2011. Newest blog posts are at www.larrapin.us
Read MoreHomemade Light Table for Seedlings (from Feb 2011)

Shelves + Lights = Seed Starting Machine!
[Encore post from 2/2011] On Sunday, February 13th the seed starting bug HIT me. I cleaned the clutter that had accumulated on the seed starting shelf I made last year (funky, but it works great!) and got going! First I wanted to add some protection since the shelf is now living in a semi-heated workshop space and had a roll of silver bubble wrap available. With the heat of the lights and the seed-starting mat, should be warm enough on cold nights. The silver bubble wrap (foil insulation from Lowe’s) also works to reflect the light, which is good.
Finished up with a drape of leftover yellow plastic tablecloth. The whole workshop kind of glows screaming lemon now, but Ada the farmdog has shown no ill effects from sharing her sleeping space with this contraption…
That tray on the right is hard to find but really handy. I think I got this one from Johnny’s. It gives you about twenty narrow “furrows” to start seeds. Once they pop up, I transplant to individual cups. That was I can start a *lot* of varieties in a small space. I have only one small seed-starting mat (like a heating pad for plants) and this fits on top of it. The bottom heat makes things sprout really, really fast but once the cool-weather seedlings are up, they will grow happily with no additional heat other than the lights…
This pic shows how many trays I can get going on just two lit shelves. The seed-start tray will be on the heat mat (for a few days) then the seedlings will be spread out in individual cups in the regular trays. Each shelf has two sets of lights, so I can line up the trays side to side and get four on a shelf…
The heat mat makes a real difference. Check out the kale that poked up in 48hrs and was as above in 72hrs!
Once the seedlings start to pop up, I remove the mat and use a spare tray to put them all very close to the lights. This is another thing that makes a BIG difference: having the lights only a couple inches above the leaves. Your seedlings will be stocky and dark green this way, rather than pale and spindly. (This is why the lights are on chains to raise/lower when the seedlings are bigger.)
I’ll check back and show the results in a few days!
Read More


